Tuesday, 5 February 2013

Contouring is an Art


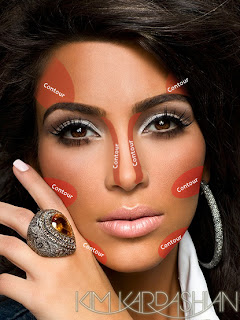
I’d talk about the art of contouring. What is contouring you may ask? Contouring is essentially the opposite of highlighting. While highlighting is meant to accentuate features in your face, contouring is meant to minimize features by darkening areas. Contouring is a great way to make your face look thinner and more structured.


To contour, you can use a contour brush, sponge, or your own fingers. Then you would either need a bronzer, liquid or powder foundation, or I have heard some people use eye shadow. Whatever your choice, you must choose a shade only slightly darker than your skin tone; maybe only two or three shades darker. Any darker will make your contouring look unnatural. The usual areas to contour are on the sides of your nose, under your cheekbone, on the sides of your forehead, and under your neck, if necessary.


Darkening the sides of your nose makes your nose look thinner. Darkening under your cheekbones gives the appearance of hollowed cheeks, which makes your cheek bones look more prominent. Contouring the sides of your forehead makes your forehead look thinner, and darkening under your neck makes your neck look thinner as well. 

When using liquid foundation, it would be best to use a sponge or finger tips. You would really need to blend the foundation into your face in the areas needed, so the areas look like they are in the shadow. If you use eye shadow or powder based foundation  to contour, you should use a contouring brush. If you need help finding a good contouring brush, MAC #168 has great reviews. Since there are both liquid and powder kinds of bronzer, you should use either liquid or powder methods to apply the bronzer. Here are pictures of Kim Kardashian before and after her makeup routine, which happens to include both highlighting and contouring.
Before

Contouring definitely takes a lot of practice, but with enough practice, your face will be ready for the cover of any magazine! I hope my tips helped, until next time!


After

Applying Foundation: Fingers or Brushes?


Applying Foundation: Fingers or Brushes?

When applying foundation, what do you usually do? Do you blend directly with your fingers or do you use tools, like brushes or sponges? 
Let's take an in-depth look at these two different techniques for applying your face makeup. 


              Fingers              Brushes


Fingers      

Why it works:
  • The natural heat of your body allows the makeup to melt in your hands.
  • Many members agree that using your fingers is more precise.
  • Brushes cost money, but your fingers are free! No splurging on expensive tools.

Why you should avoid it:
  • If you don't wash your hands, using your fingers can spread bacteria to the face.
  • Even if you do wash your hands, fingers still spread oils around that lead to acne.
  • Finger application can be messy - watch out for stained hands!


Brushes
Why it works:
  • With so many brush types, you can experiment for the perfect finish.
  • Having a brush set allows you to apply makeup on friends without the germs.
  • Brushes (and sponges) usually give a lighter, less caked-on finish.

Why you should avoid it:
  • Brushes and sponges are absorbent, so you might waste more product.
  • Without proper cleaning, these tools will be full of bacteria and dead skin cells.
  • Makeup brushes and sponges can be expensive if you're a newbie. 


Final verdict:  Both techniques have the same number of pros and cons, so there's no clear answer as to which is the best. Experiment and find what works best for you. You might find, for example, that brushes are better for powders while fingers are better for liquids.

No matter which technique you use, though, make sure you keep your tools (whether they're attached to your body or not!) clean before makeup application. Brushes should be washed at least once a week with brush cleanser, and your make sure you wash your hands before rubbing on product.


Recommended Products:
  • MAC #190 Foundation Brush
  • Chris Krenzer 24 piece Synthetic Brush Set
  • NIMA Brushes
  • e.l.f. Studio Brush Cleaner