Friday, 28 September 2012

Spray Tan Kit with FREE Training


             ****Amazing Offer *******
     

Full professional spary tan starter kit includes :
1x 700 HVLP Spray Tan System
1x Pop up Spray Tan cubicle
1x Litre Spray Sunset Vitamin Based Tan
Free Spray Tan Training
http://www.allbeautybrands.com/hvlp-spray-tan-kit-special-offer-p-621.html


Monday, 24 September 2012

Little Mix Halloween Make-up X Factor

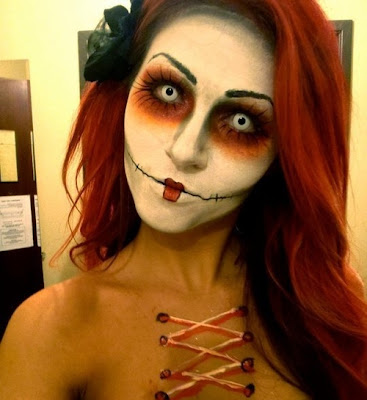
Tonight I tried out a makeup look unlike anything I have really attepted before. It's a makeup that makes it look as though you have a doll's face stapled onto your own, which was worn by a girl group on last year's Halloween X Factor .
My little niece Cheyenne Modeled for me 


"Little Mix" girl group in the Halloween X Factor 2011


So this time rather than just taking a photo of the end result, I've taken step by step photos to show how I created this look. 


Step 1

I drew the outline of the "mask" on the face lightly with a Snazaroo black face paint,
eyeliner pencil will do if you don't have face paint. 


Step 2


Step 2: Using a white foundation or face paint, colour the "mask" area


Step3


Step 3: Using a black eyeliner pencil, go over the mask outline that you made earlier. Also draw in the "staples". They're simply rectangles that start just in the mask area and finish in the regular skin area. Also you can draw in some small curved lines where the "staples" are attached to the "mask" to indicate the "material" stretching and pulling. 
For adults- Take your regular foundation and apply it to all the areas that you haven't painted white.Then take the black face paint or a dark grey eye-shadow and apply it around the mask area. Blend it a little to replicate a shadow. 


Step 4


Step 4 :Using a bright pink blusher, apply it to the apples of your cheeks and blend it back a little. Don't worry about being subtle with it, because bright blusher looks much more doll-like. At this point I also darkened the eyebrows with an eyebrow pencil because there was white foundation on them.


Step 5


Step 5:  Apply black eyeliner around the eyes I used black face paint for a child as its easier to wash off. Take a white eyeliner and apply it to the inner rims of the eyes. Out line the lip with the eyeliner or black paint.
If you have them, now would be the time to apply false eyelashes on your top and bottom lashes. This would really enhance the look, but if you don't have any then you'll just have to layer up your mascara.


Step 6

Step 6: . I then filled it in the lips with red lipstick, outlined the coloured area fairly thickly with a black eyeliner pencil and finally blended it into the red lipstick slightly, leaving some of the outline still bold. 

Step 7


                                                                     Dress up and have FUN


Saturday, 22 September 2012

1920s Flapper Makeup for Halloween


1920s Flapper

Complete your 1920s flapper or "Chicago" musical character costume with a made-up face straight from the Roaring Twenties. Makeup from the 1920s was dark and dramatic and wasn't concerned with looking "natural." The movie starlets had to emphasise their features so they would show up on screen, which is what set the tone for the make-up of the decade.


Matt Finish

Before applying any make-up, wash your face and exfoliate with a gentle cleanser so that you have a clean, smooth surface on which to work. A gentle and inexpensive exfoliate that may already be in your kitche, is sugar. Gently scrub your skin in circular motions with the sugar until it dissolves on your skin and rinse it off thoroughly to remove dead skin cells. Apply a powder one or two shades lighter than your skin colour all over your face. Women didn't have cream foundation in the 1920s, so they used powder which gave their skin a matt finish. Be sure to blend it in around the edges of your face.


Rouge

Suck in your cheeks and place two fingers next to your nose to help you find where to apply a cream blush. Dab a small amount next to your fingers and blend it out along the apples of your cheeks, or the fleshy round part, and back along your cheek bone. Work in circular motions, concentrate the colour on the apples of your cheeks and blend well along the edges. Use a colour such as light red or raspberry, which were the main colours of rouge in the '20s.


Cupid's Bow

Choose a deep red, reddish-plum or red-orange colour of lipstick and a matching lip liner pencil. Start a line directly above your natural line, above one of the points in the middle of your upper lip. Draw the line down between the two points in an arch and up above to the other point. This is the beginning of your cupid's bow. Bring the lines down to the inner part of the corners of your mouth to make your mouth look shorter. Make sure you bring the lines down to the same point on either side of your mouth so it looks even. Draw the bottom lip so that it arches downward right below the lip line in the middle of your lower lip. Fill in the lines with your lipstick.


Bold Brows

Accentuate your eyebrows with a light brown eyeliner or eyebrow pencil, if you have blond to light brown hair, or a black or dark brown pencil if you have dark hair. Flappers often shaved their eyebrows off completely and drew them back on, but if you don't want to do this, apply powder to your eyebrows to camouflage them and draw a thin line starting from the inner corner and slope it downward under your natural eyebrow. Thicken the line slightly at the inner corners and gradually make it thinner toward the outer corners.


Dramatic Eyes

Apply a light grey, light blue or turquoise eye shadow from your upper eyelashes to right below your eyebrows and blend it well along the edges. Load some medium grey or darker blue on the tip of an eye shadow brush, apply it along the edges of your eyes, all the way around and blend. Brush a dark grey shadow in the crease of your eyes and concentrate it in the inner, upper corners of the crease. Line along the edges of your lashes with black liquid liner and finish with two coats of black mascara. Don't worry if your lashes look a little spidery; this look was common among flappers, as it emphasised the lashes.


Ta Dah!


Wednesday, 19 September 2012

Classy up style - How to


A chignon is a classic style for bridal hair and if you're good at styling your own hair, you can even do it yourself if need be, although it's best to get help from your bridesmaids to ensure it's absolutely perfect. The chignon is an elegant style that will smooth out your hair and keep it intact throughout your wedding event.
Note that for a chignon to work properly, you will need very, very, long and straight hair. If your hair is not long enough, you will find that the resulting chignon looks messy, which may not be ideal for your wedding look.

                                          Step 1
Wash and dry your hair. Use styling products that will ensure total smoothness of your hair. Comb your hair before commencing.


Step 2
Leaving most of your hair loose, take a piece of hair from the left side and right side of your head, in order to make a small ponytail over the top of the rest of your hair. Pull these two pieces together at the middle and tie with a clear elastic to form the miniature ponytail. Don't pull too tightly; there should be plenty of space in the side pieces.


Step 3

Tease the ponytail part only. This is the only part of the hair that will stay messy because it serves as the filling inside the chignon, to help keep the chignon rounded.


Step 4
Make another ponytail using the remaining hair that is still loose. This should be a few inches or centimeters from the base of your hair.


Step 5
Take the long, bottom ponytail and bring it up and over the top ponytail. Pull it through the top ponytail carefully and neatly.


Step 6
Tuck the end of the long ponytail inside the loop of hair that this action has created. Ensure that the teased part of the top ponytail is also neatly tucked under and is helping to hold out the chignon. Secure the chignon in place using bobby pins or clips.


Step 7
Spray with hairspray. This look needs to be kept strong with spray, so be generous.


Step 8
Add hair ornaments after your chignon is completed. If adding flowers or other decorative effects to your hair, do so after the chignon has been made. It is recommended that the chignon be the starring feature though, so don't overdo any decorations.


Ta Dah !!


www.allbeautybrands.com


Chignon Bun Updo How-To


Chignon Step 1

Collect hair into a ponytail at nape of neck and secure with a clear or hair-colored elastic.

Chignon Step 2

Pull the ponytail through a chignon pillow (found at beauty supply stores).


Chignon Step 3

Wrap hair around the pillow.


Chignon Step 4

Secure with bobby pins.


Chignon Step 5

For a sophisticated and clean look, slick hair back. For a more romantic look, try a sideswept front.

Chignon Finished Style

This elegant style is slimming for round faces, especially when volume is added at the crown to elongate the face.


                                                                         Ta Dah!!


www.allbeautybrands.com


French Roll Upstyle - How to


Step-by-step instructions on how to create French Roll at home

French Roll Step 1

Gather hair into a ponytail between crown and nape, but don't anchor it.

French Roll Step 2

Twist the ponytail all around, twice.

French Roll Step 3

Tuck ends into twist and secure with bobby pins. Smooth out the rest of the hair by carefully brushing over the twist and securing strays.


French Roll Finished Style

The French twist is good for all face shapes, since you can customize by adjusting hair volume to flatter face shape.


                                                                 Ta Dah !!


Got a question? Email tinanewman235@gmail.com
www.allbeautybrands.com