Thursday 13 December 2012

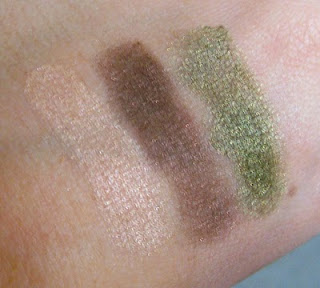
Green Eye Shadow Trio Chris Krenzer


Chris Krenzers  Clinical skin  Care make line is embraced by leading skincare professionals. Created by  Irish makeup artists and skin care professionals Tina Newman & Hazel Reilly. Chris Krenzer offers innovative new products with a Colour palette rich with the hottest hues and timeless Classic Colour.


I think this is a fantastic, velvety soft eyeshadow trio! I know it's an eyeshadow product I like when I can't decide which shade I like best! They all look great together- and if you'd like to see a tutorial using these shades, let me know. All of the colors have a subtle shimmer- without looking like over-the-top glitter mania. The champagne color is gorgeous- makes a great lid shade or highlight. The brownish color shade is actually more of a plum- it's so unique. It has a reddish-coppery sparkle that I love. Looks pretty as a smokey powder liner! And the green is phenomenal. Even if you don't gravitate toward green eyeshadow- I promise this is a gorgeous, wearable shade. Can't say enough about these colors. While they're powder- they have this unique creamy-smooth texture. When used with a primer, they're long wearing & delightful!


Thanks to Chris Krenzer Mineral Cosmetics for allowing me to try these products, and if you get a chance to try them yourself, let me know what you think! Have a great day!

www.beautybrands.ie

Monday 12 November 2012

Nail Trends: DIY - Christian Louboutin Nails


Christian Louboutin Nails


The Louboutin manicure is fastly becoming the latest nail trend, as nail technician I have to keep myself updated with all the latest nail trend, i tired the Louboutin manicure a few months back but most of clients were not really interested in it and found it a bit crazy to paint underneath the nails. Now that the trend is fastly spreading, everyone wants a Louboutin manicure now, so Ive decided to post a step by step tutorial on how to achieve the Louboutin manicure.

You Will Need...
1. Nail Polish Remover
2. A Cuticle Stick
3. Black Nail Polish
4. Red Nail Polish
5. Cotton pad
6.Base Coat and Top Coat


Step 1


Remove nail polish and cleanse nail with nail polish remover and cotton pad.


Step 2


Push cuticles back with cuticle stick and apply base coat to protect your nail from getting stained with black nail polish. 


Step 3


Paint the underneath of your nails with a red nail polish to resembles the bottoms of  a Christian Louboutin shoe. I found it easier to paint the underneath of my nails first, its up to you which way you want to do it, if its easier to do step four first then do it that way.


Step 4


Polish your nails with black nail polish, i used OPI polishes but Barry M nail polishes are really good and much cheaper. After painting your nails apply clear shiny top coat.

Step 5


Clean up the excess polish around you nail bed and apply cuticle oil. 


Hot New Beauty Product !


ILAH BROWS

In today’s market we are all looking for that quick fix makeover that makes an impact on our image. But nothing has more impact than well groomed, face-framing brows. Over 70% of your facial expressions depend on your eyebrows. And that’s why the right brow shape and colour can take years off you.

Ilah Brows in a Celebrity favourite with celbs from The Only way is Essex, Coronation Street, Hollyoaks, XFactor to name but a few.


About Tahira
Tahira Wells has pampered the likes of sir Paul McCarthney. The Barness of Scotland and Premiership Footballers. As one of the most trusted and experienced experts in the industry, Tahira is excited to introduce to you, ILAH Brows.

Whether you are in the MOOD OF BEING “The Rock Chick”, “Glamour Puss” or just the “Prefect Princess” – ILAH Brows has just what you need. We have even taken the hard work out of creating the perfect brow with 6 stencils to choose from. Just use your precision angled brush to shape your brows and away you go.

 ILAH Brow powder is a semi permanent mineral compact that is, sweat resistant, splash resistant and even UV filtered... So don’t worry girls... your brows will still be there if you get caught in the rain !

“In today’s market we are all looking for that quick fix makeover that makes an impact on our image. For years I have searched for a product with the WOW factor and I believe that ILAH Brows is the answer for all your brow needs”


The Product
Semi Permenant mineral brow powder, lasts upto 24hrs. This product is waterproof and sweat proof. The brow powder can be removed easily.
Angled Brush
Professional makeup brush with a flat edge for ease of creating the perfect brow. Also can be used as an eyeline brush.
Brow Stencils
Use the stencils to decide who you want to be....Hold either corner with two fore fingers, use the brow brush and rub back and forth ensuring the minerals are fully worked into the brows. 6 Brow Stencils to choose from.
 
The Salon Treatment
The eight step procedure involves a consultation and eyebrow assessment followed by a mixture of waxing, threading, tinting, trimming and aftercare maintenance. In today’s market we are all looking for that quick fix makeover that makes an impact on our image. But nothing has more impact than well groomed, face-framing brows.


CONTACT: Tina Newman
Irish Distributor: Beauty Brands
Ph:00353 (0)45 944751

Monday 5 November 2012

Eye Liner Stickers

You may have repeatedly seen the stickers which help to make eye makeup in the style of smoky eyes. But now there have been produced the stickers that can make the eyeliner truly ideal and creative. All Beauty Brands.com was among the first to offer this novelty in Ireland.


In the season of Fall-2011 a special focus will be on the eyes. The Nude effect remains for the summer. And in the coming season, dramatic and even a little theatrical eye makeup will be fashionable.
In order to achieve artistic eye lining you will need certain skills, or a set of stickers, such as the ones found on www.allbeautybrands.com. As a result of its application, you will have a smooth and rich in color eyeliner which can be adorned with  crystals if you wish.
A set of stickers includes:
5 pairs of stickers in pure black.You can chose from a variety of styles and sizes.


In general, the use of stickers in makeup is likely to become a usual thing soon. Shadow stickers will probably no longer surprise anyone, as well as stickers for lips makeup. The technologies are different: imitating decals and temporary tattoo. But the idea is clear – to make various styles of makeup the most affordable ones.


How to apply shadow stickers:
  • They are for dry skin without makeup.
  • One should carefully unfasten the eye liner sticker from the base.
  • Apply the sticker on the lash line. You can use a little water to ensure it has transferred.
  • The sticker can last up to several days if transferred carefully
  • To remove: rub with cold cream of baby oil. Alcohol based products will remove it instantly.

Monday 8 October 2012

Marilyn Monroe Makeup Step by Step


Marilyn Monroe Make up


The most important factor when applying makeup, especially when trying to recreate a 1940's or 1950's style is above all the skin as it was always flawless.

STEP 1: SKIN
The reason Marilyn's skin always looked flawless was partly down to the makeup application but largely due to her skin care regime. Makeup applies better on moisturised skin, and although Marilyn used to moisturise with petroleum jelly (vaseline), you can achieve the same by moisturising routinely and using a silicon based primer (such as GOSH Velvet Touch Foundation Primer) before applying your makeup. This will smooth out any imperfections and keep the makeup fresher and longer lasting.
When selecting a foundation choose the lightest matt shade suitable for your skin tone (preferably full coverage) and apply all over as normal (remembering to blend into the neck and ears). Using a concealer that is a very similar colour to the base foundation, apply to under eye area and any imperfections visible. Due to female hormones we also tend to be quite red around the nose/nostrils, mouth and chin so apply to those areas if necessary before setting with a light dusting of translucent powder. Try Chris Krenzer Mineral Makeup.

STEP 2: CONTOURING
Marilyn was very self conscious of her forehead as she thought it was quite wide and she also disliked the shape of her nose as it is naturally quite round and bulbous at the tip so contouring played an important part of her makeup routine. Contouring was used to exaggerate any existing shadows so slim down certain parts of the face, this can be achieved by using either a bronzer or a foundation which is approximately 3-4 shades darker than your natural skin tone and applying it to the following areas: under the jawline and blending down the neck, below the cheekbones, temples and blending up into the hairline and also down the side of the nose - IT IS IMPORTANT THAT YOU BLEND THIS IN WELL OR YOU WILL JUST LOOK LIKE YOU HAVE A DIRTY FACE.

STEP 3: EYEBROWS
Miss Monroe's eyebrows were almost like an upside down V in shape with the arch being fairly central, this was another trick she used to try draw attention away from her wide forehead. To achieve this look you can either use an eyebrow pencil or eyeshadow (ILAH Brow stencils work great) and brow brush to define and give shape. For best results I tend to use eyeshadow and a brow brush as you can achieve a closer match to your brow colour by combining shades of brown/cork.


STEP 4: EYES
Apply an off-white eyeshadow over the lid and all the way up to the brow. With a light brown eyeshadow, apply to the crease and up to the brow on the outer corner of the eye (1&2). Apply a frosted white/off white shadow to the inner corner of the eye, the middle of the lid, under the brow and just over the top of the brows (3,4,5,6 &7).

To line the eye, Whitey would apply a white pencil to the lower water line of the eye and also draw a white triangle at the outer corner of her eye which he would then blend outwards. To complete the look he would line her upper lid (close to the lash line) with a BROWN eyeliner and then add a little liner to her bottom lashes to create a shadow effect from her lashes (as shown in red). You can also add a gold eyeshadow over the top edge of the upper liner to make it a little more glamorous (but make sure it is not thick as it may start to look over the top). Coat lashes with black mascara and add strip lashes to the outer corner of the eye. Last but not least, Whitey also used to add a small dot of red lipliner to the inner corner of the eye as this will contrast with the whites of the eye and make them appear brighter.

STEP 5: HIGHLIGHTING
Apply a shimmery highlighter or eyeshadow (I use Chris Krenzer Baked Minerals) to the top of the cheekbones, down the centre of the nose, centre of the forehead, browbone, chin and above the cupids bow (after lipstick application).


STEP 6: LIPS
For Marilyn's perfect pout a combination of 3-5 different shades of red with bluish tones were used (this was because Technicolor had a tendancy to make everything look more orange in film). Before applying the lipstick however, her makeup artist would draw just above the cupids bow with a white eyeliner pencil and then blend in to give the illusion of a fuller upper lip. A dark/brick red liner should then be applied to the lips, just outside the lip line and rounding off any sharp angles. A lighter shade of red was used in the middle of the lips and then the darker shades towards the edges to make the lips look more voluptuous. To finish, apply a little shimmer to the cupids bow and the very centre of the lips.

Notice how the lips are nice and rounded (this was very common for the era) and also how the corners of the top lip are wider than the lower lip.

STEP 7: BEAUTY MARK
By now you should have the desired effect but there is one thing missing... The iconic Marilyn Beauty Mark. To achieve this is very simple - some people will use a black pencil (which is fine but tends to look a little unnatural). I tend to use a very small brush with some dark brown eyeshadow to dot it on the skin but you could also use a brown pencil (experiment and see what works best for you) then as with everything, apply a small amount of powder to set the look and you are good to go.


TA DAH!!

HD OR ILAH Brows?

    In today’s market we are all looking for that quick fix makeover that makes an impact on our image. But nothing has more impact than well groomed, face-framing brows. Over 70% of your facial expressions depend on your eyebrows. And that’s why the right brow shape and colour can take years off you.

So which one to choose? HD or ILah Brows.

Well if you’re thinking of bringing this treatment into your salon there are a few things to consider.
  How much is the training?
 How much to charge for the treatment?
Is there retail to support the treatment?


HD Brows
Training for salons - € 1300 (includes kit)
Treatment Charge -€50.00
Retail - Yes

ILAH Brows
Training for salons - € 350 (includes Kit)
Treatment Charge -€35.00
Retail - Yes

The HD Brow treatment 7 steps
The seven step procedure involves a consultation and eyebrow assessment followed by a mixture of waxing, threading, tinting, trimming and aftercare maintenance. Here are the steps in more detail…
  1. Consultation –assess your face shape, colouring, and natural brows and discuss your ideal look, to determine the best brow shape for you.
  2. Tinting –apply a tint to the brow to fill in gaps between the hairs and darken lighter hairs.
  3. Waxing –wax both above and below the brow line to create the perfect shape for you.
  4. Threading –thread the small hairs around the brows so they blend naturally in to the hairline.
  5. Tweezing –remove those pesky stubborn hairs with tweezers to perfectly fine tune your shape.
  6. Trimming –snip away any long straggly hairs so that your brow keeps its new defined shape.
  7. Aftercare –show you how to maintain your HD brow look at home, explaining how to use the HD Brow palette to groom your brows and how to apply the brow pencil and powder to further sculpt your brows at home.


 ILAH brows  8 Steps
ILAH brows  focuses on how to create the perfect brow through using  6 different stencils. 99% of our customers fit into theses shapes.

1.       Consultation-Precision cutting techniques for the brow- colouring, and natural brows and discuss your ideal look, to determine the best brow shape for you.
2.       Shaping,- Traditional brow shaping measuring methods for all face shapes- assess your face   shape,
3.       Tinting -Application of semi-permanent tint which last 6 weeks- apply a tint to the brow to fill in gaps between the hairs and darken lighter hairs.
4.       Threading - with antiseptic thread and figure of 8 method
5.       Tweezing – thread the small hairs around the brows so they blend naturally in to the hairline.
6.       Waxing - if threading is not required- wax both above and below the brow line to create the perfect shape for you.
7.       Trimming –snip away any long straggly hairs so that your brow keeps its new defined shape.
8.       Semi-permanent- powder lasting 24hrs - Correct usage of powders, Wet,dry,balm
9.       After care/sales-  How to apply the mineral powder and stencils to further sculpt your brows at home.


For me the ILAH Brow wins hands down! Its affordable for both the salon and the customer. 
So there you have it..  Should you require further information please leave a comment below..

Thanks

http://www.ilahbrows.co.uk  or  Call 00353 (0)45944751 for ILAH Brow Ireland

Friday 28 September 2012

Spray Tan Kit with FREE Training


             ****Amazing Offer *******
     

Full professional spary tan starter kit includes :
1x 700 HVLP Spray Tan System
1x Pop up Spray Tan cubicle
1x Litre Spray Sunset Vitamin Based Tan
Free Spray Tan Training
http://www.allbeautybrands.com/hvlp-spray-tan-kit-special-offer-p-621.html


Monday 24 September 2012

Little Mix Halloween Make-up X Factor

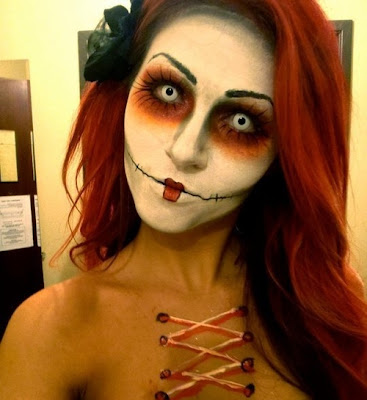
Tonight I tried out a makeup look unlike anything I have really attepted before. It's a makeup that makes it look as though you have a doll's face stapled onto your own, which was worn by a girl group on last year's Halloween X Factor .
My little niece Cheyenne Modeled for me 


"Little Mix" girl group in the Halloween X Factor 2011


So this time rather than just taking a photo of the end result, I've taken step by step photos to show how I created this look. 


Step 1

I drew the outline of the "mask" on the face lightly with a Snazaroo black face paint,
eyeliner pencil will do if you don't have face paint. 


Step 2


Step 2: Using a white foundation or face paint, colour the "mask" area


Step3


Step 3: Using a black eyeliner pencil, go over the mask outline that you made earlier. Also draw in the "staples". They're simply rectangles that start just in the mask area and finish in the regular skin area. Also you can draw in some small curved lines where the "staples" are attached to the "mask" to indicate the "material" stretching and pulling. 
For adults- Take your regular foundation and apply it to all the areas that you haven't painted white.Then take the black face paint or a dark grey eye-shadow and apply it around the mask area. Blend it a little to replicate a shadow. 


Step 4


Step 4 :Using a bright pink blusher, apply it to the apples of your cheeks and blend it back a little. Don't worry about being subtle with it, because bright blusher looks much more doll-like. At this point I also darkened the eyebrows with an eyebrow pencil because there was white foundation on them.


Step 5


Step 5:  Apply black eyeliner around the eyes I used black face paint for a child as its easier to wash off. Take a white eyeliner and apply it to the inner rims of the eyes. Out line the lip with the eyeliner or black paint.
If you have them, now would be the time to apply false eyelashes on your top and bottom lashes. This would really enhance the look, but if you don't have any then you'll just have to layer up your mascara.


Step 6

Step 6: . I then filled it in the lips with red lipstick, outlined the coloured area fairly thickly with a black eyeliner pencil and finally blended it into the red lipstick slightly, leaving some of the outline still bold. 

Step 7


                                                                     Dress up and have FUN


Saturday 22 September 2012

1920s Flapper Makeup for Halloween


1920s Flapper

Complete your 1920s flapper or "Chicago" musical character costume with a made-up face straight from the Roaring Twenties. Makeup from the 1920s was dark and dramatic and wasn't concerned with looking "natural." The movie starlets had to emphasise their features so they would show up on screen, which is what set the tone for the make-up of the decade.


Matt Finish

Before applying any make-up, wash your face and exfoliate with a gentle cleanser so that you have a clean, smooth surface on which to work. A gentle and inexpensive exfoliate that may already be in your kitche, is sugar. Gently scrub your skin in circular motions with the sugar until it dissolves on your skin and rinse it off thoroughly to remove dead skin cells. Apply a powder one or two shades lighter than your skin colour all over your face. Women didn't have cream foundation in the 1920s, so they used powder which gave their skin a matt finish. Be sure to blend it in around the edges of your face.


Rouge

Suck in your cheeks and place two fingers next to your nose to help you find where to apply a cream blush. Dab a small amount next to your fingers and blend it out along the apples of your cheeks, or the fleshy round part, and back along your cheek bone. Work in circular motions, concentrate the colour on the apples of your cheeks and blend well along the edges. Use a colour such as light red or raspberry, which were the main colours of rouge in the '20s.


Cupid's Bow

Choose a deep red, reddish-plum or red-orange colour of lipstick and a matching lip liner pencil. Start a line directly above your natural line, above one of the points in the middle of your upper lip. Draw the line down between the two points in an arch and up above to the other point. This is the beginning of your cupid's bow. Bring the lines down to the inner part of the corners of your mouth to make your mouth look shorter. Make sure you bring the lines down to the same point on either side of your mouth so it looks even. Draw the bottom lip so that it arches downward right below the lip line in the middle of your lower lip. Fill in the lines with your lipstick.


Bold Brows

Accentuate your eyebrows with a light brown eyeliner or eyebrow pencil, if you have blond to light brown hair, or a black or dark brown pencil if you have dark hair. Flappers often shaved their eyebrows off completely and drew them back on, but if you don't want to do this, apply powder to your eyebrows to camouflage them and draw a thin line starting from the inner corner and slope it downward under your natural eyebrow. Thicken the line slightly at the inner corners and gradually make it thinner toward the outer corners.


Dramatic Eyes

Apply a light grey, light blue or turquoise eye shadow from your upper eyelashes to right below your eyebrows and blend it well along the edges. Load some medium grey or darker blue on the tip of an eye shadow brush, apply it along the edges of your eyes, all the way around and blend. Brush a dark grey shadow in the crease of your eyes and concentrate it in the inner, upper corners of the crease. Line along the edges of your lashes with black liquid liner and finish with two coats of black mascara. Don't worry if your lashes look a little spidery; this look was common among flappers, as it emphasised the lashes.


Ta Dah!